Bose Lifestyle VS-1 Spécifications
Naviguer en ligne ou télécharger Spécifications pour Équipement musical supplémentaire Bose Lifestyle VS-1. Bose Lifestyle VS-1 Specifications [en] Manuel d'utilisatio
- Page / 24
- Table des matières
- DEPANNAGE
- MARQUE LIVRES
- LIFESTYLE 1
- Important Safety Information 2
- Safety Information 3
- Contents 4
- For your records 5
- If you need additional cables 5
- If you have a LIFESTYLE 6
- system 6
- Connecting the Quadra cable 6
- Your Connection Options 7
- Your TV connection panel 7
- Component video 8
- S-Video cable 10
- (Supplied with 10
- DO NOT USE 11
- Composite cable 12
- Source Audio Connections 14
- Program Recording Connections 15
- Recording programs 15
- Updating the system software 16
- Activating component video 16
- Operating Information 16
- Switching sources 17
- Mounting Your VS-1 on a Wall 18
- Required tools 18
- Recommended hardware 18
- Maintaining Your VS-1 19
- Cleaning 19
- Troubleshooting 19
- Technical information 20
- Contacting Customer Service 20
- Limited Warranty 21
- )UDPLQJKDP0$86$ 24
Résumé du contenu
2ZQHU¶V*XLGH%UXJHUYHMOHGQLQJ%HGLHQXQJVDQOHLWXQJ*XtDGHXVDULR1RWLFHG¶XWLOLWVDWLRQ0DQXDOHGLLVWUX]LRQL*HEUXLNVDDQZLM]LQJ%UXNVDQYLVQLQJHQVideo Expand
10For an S-Video Connection Between Your TV and the VS-1Connecting your TV to the VS-1 (S-Video)Follow the instructions on this page and the next if y
11For an S-Video Connection Between Your TV and the VS-1çpgçpgChoosing connection types for your video sourcesIf you connected your TV to the VS-1 usi
12For a Composite Connection Between Your TV and the VS-1Connecting your TV to the VS-1 (Composite)Follow the instructions on this page and the next i
13For a Composite Connection Between Your TV and the VS-1çpgçpgConnecting your sources to the VS-1If you connected your TV to the VS-1 using a composi
14Source Audio ConnectionsNow that all the video connections are made, you can connect the audio sources to the media center.Connect the audio OUT jac
15çpgçpgProgram Recording ConnectionsConnecting your cable/satellite box to your VCR/DVRIf you occasionally want to record programs from your cable se
16Operating InformationUpdating the system softwareYour DVD home entertainment system might need a software update to enable it to operate the VS-1. F
17Operating InformationçpgçpgSwitching sourcesAfter adding the VS-1 to your system setup, switching sources is greatly simplified. Just press the remo
18Mounting Your VS-1 on a WallRequired toolsRecommended hardwareInstall two screws eight inches apart. Leave ¼ in (6 mm) between wall surface and scre
19çpgçpgMaintaining Your VS-1Cleaning• Use only a soft, dry cloth to clean the outside of the VS-1. • Do not use any solvents, chemicals, or cleaning
21. Read these instructions – for all components before using this product. 2. Keep these instructions – for future reference. 3. Heed all warnings –
Maintaining Your VS-120Technical informationDimensionsSize of the housing with the RCA jacks (excluding cable and bend relief):12.8" W x 4.1"
21Maintaining Your VS-1çpgçpgLimited WarrantyBose CorporationThe Mountain Framingham, MA 01701What is covered:All parts defective in material and work
Maintaining Your VS-122
23Maintaining Your VS-1çpgçpg
5 %RVH&RUSRUDWLRQ7KH0RXQWDLQ)UDPLQJKDP0$86$$05HY&&0
3çpgçpgPlease read this installation guidePlease take the time to follow this installation guide carefully. It will help you set up and operate your s
4ContentsIntroduction . . . . . . . . . . . . . . . . . . . . . . . . . . . . . . . . . . . . . . . . 5About your LIFESTYLE® system VS-1 video expa
5çpgçpgIntroductionAbout your LIFESTYLE® system VS-1 video expanderThe LIFESTYLE® system VS-1 video expander is designed to sim-plify your system setu
6Connecting the VS-1 to Your Media CenterIf you have a LIFESTYLE® system in your homeIf you already have set up a LIFESTYLE® system in your home, comp
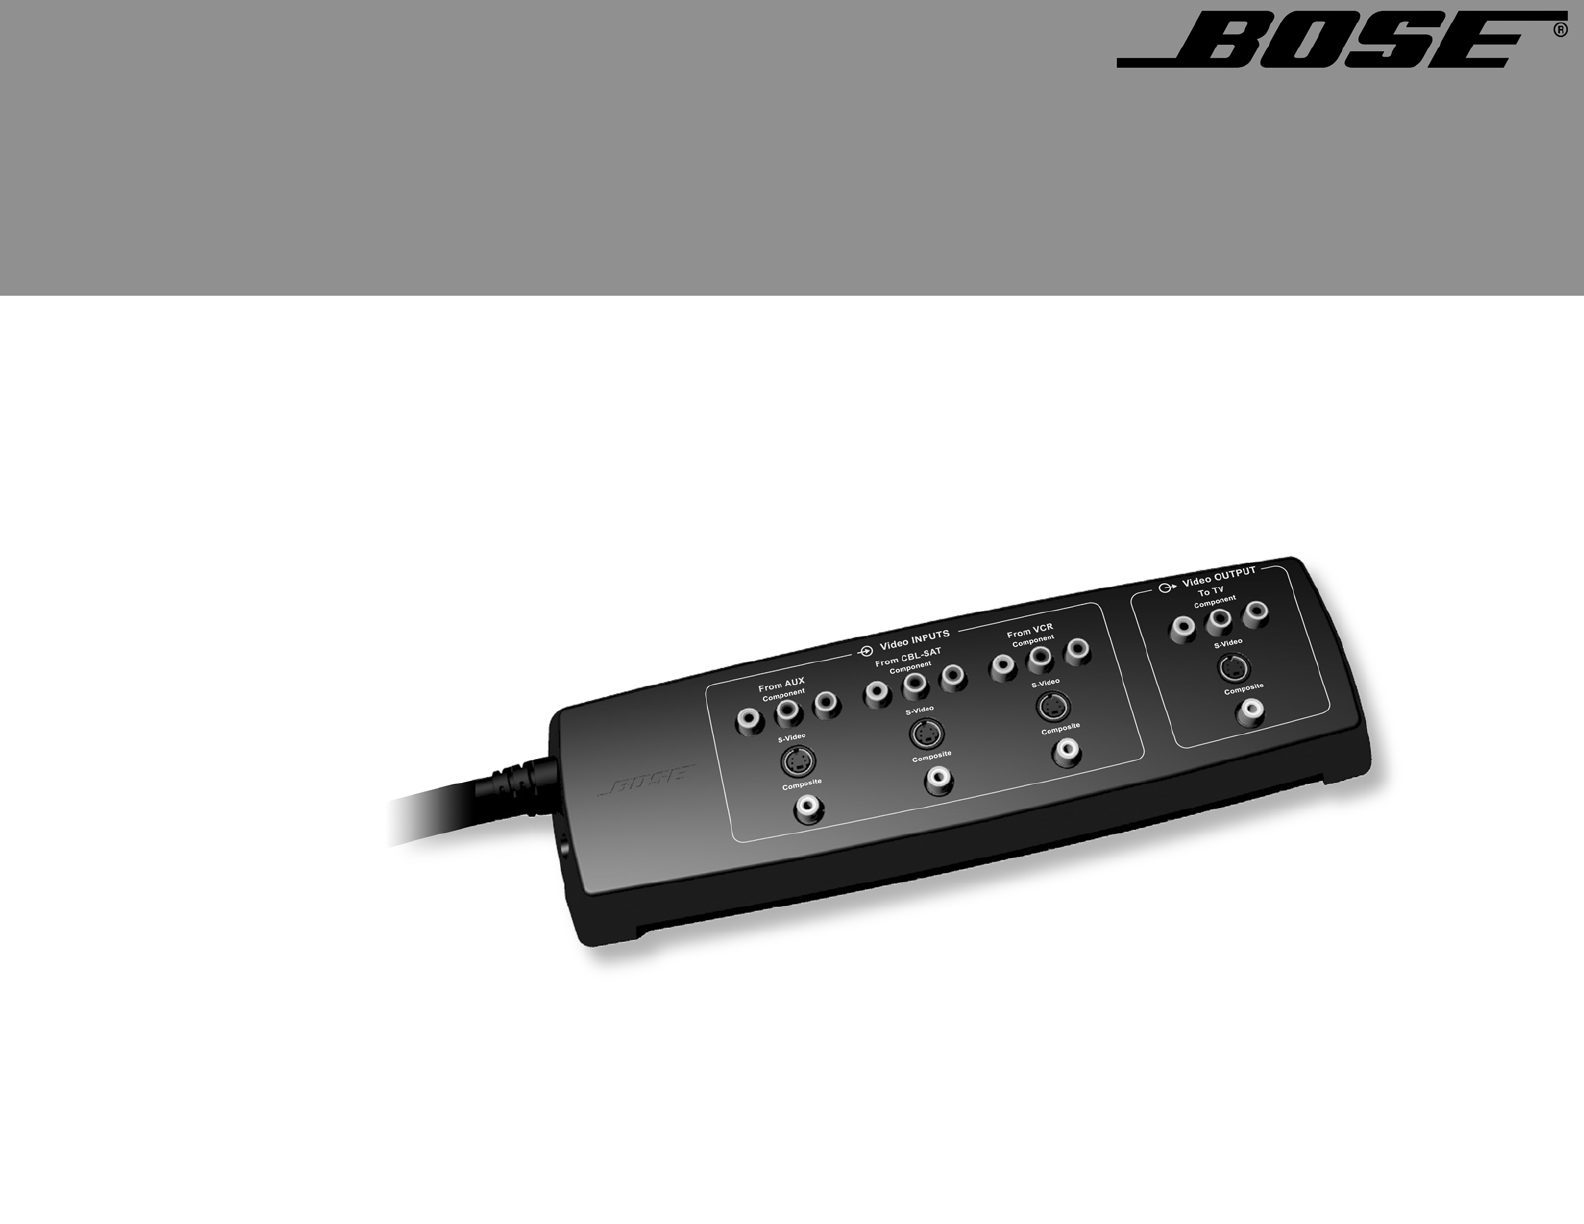
7çpgçpgYour Connection OptionsYour TV connection panelYour TV may have more than one type of video input connection. Each type provides a different le
8For a Component Connection Between Your TV and the VS-1Connecting your TV to the VS-1 (Component)Follow the instructions on this page and the next if
9For a Component Connection Between Your TV and the VS-1çpgçpgChoosing connection types for your video sources1. Look at the rear panel of all your so
Produits connexes et manuels pour Équipement musical supplémentaire Bose Lifestyle VS-1
 (18 pages)
 (36 pages)
© 2020, manymanuals.fr. Tous droits réservés | 0.355 s |
 Manymanuals.com
 Manymanuals.de
 Manymanuals.fr
 Manymanuals.it
 Manymanuals.pl
 Manymanuals.cz
 Manymanuals.es
 Manymanuals-pt.com
Commentaires sur ces manuels